
A DIY Loft Conversion that went Worryingly Smoothly
This father and son team discover that a DIY loft conversion doesn't have to be a nightmare and can even be a great bonding experience! Guest writer Nick Taylor walks us through their adventure and then covers some key tips to consider if you are thinking about undertaking this sort of project yourself.
My home has always been a bungalow. Our version of ‘upstairs’ was, until recently, hopping up the two steps from the back patio into the house. Around this time last year, my retired father and I set to work converting our storage loft space into a… well, we didn’t really know what, other than we were ‘doing a loft conversion’.
Our house is a 4-bedroom bungalow in Horwich, North West England. The space in the pitched-roof has always been used essentially as a dump for all the stuff we rarely used, but didn’t want to get rid of. Dad reasoned he could kill two birds with one stone by turning it into a proper room... It would add value to the house, and mean we finally had to tackle the build up of rubbish, as well as being a great project for he and I to do together.
The first task of our new DIY loft conversion project was to clear out the junk, no mean feat given there was 20 years’ worth of 6 people’s (I have three brothers) belongings.

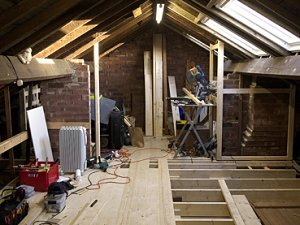
The picture above shows the loft after we’d already cleared half of the junk, and put in the Velux skylights.
Next up was removing the existing floorboards. This was a case of using a crowbar to lever them away from the joists below, and was fairly easy, but required real care and balance to ensure we didn’t miss our footing and end up putting a foot through the ceiling.
As the loft space had originally been built to only support a moderate load, we had to replace the existing joists with new ones double the size (6” x 2”), as well as ensure they were supported from below by load-bearing walls.

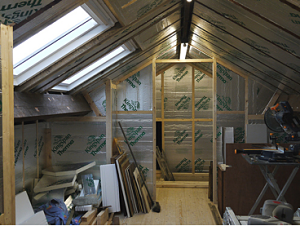
Here you can see the new joists in place, being supported by the load-bearing wall in the middle, as well as the newly created beam on the far right of the picture. We took great care to ensure the new joists were perfectly level and in line, meaning fitting the floorboards on top of them would be a smooth process.
Once we had the new joists in place we could begin to fit the new floorboards, and get a real sense of how big the room would be in the end. Thanks to the care taken with the joists, the floorboards did indeed to down very easily, we screwed them in place using probably three times more screws than they needed; my Dad’s always preferred the ‘better safe than sorry’ approach.
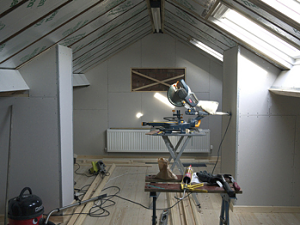
Once we had the floorboards in place we were able to make a start on what would eventually become the walls. This involved ‘boxing off’ the various obstacles, such as chimney stacks, which would need to be walled around. These boxed sections were the structures used to attach the plasterboard sheets to and therefore had to be perfectly vertical.
The next stage of our DIY loft conversion project was to insulate the room. We used a product called Kingspan, which comes in large sheets (6’ x 4’), which are then cut into size fairly easily using a saw and wedged into the gaps between the upright timber.
It was around this time that we, or more accurately my Dad, decided on what the new space would actually be used for. Surprise surprise, it was going to feature a new office-type room for him to move into, as well as a new lounge room complete with fold-out bed for friends to use on visits. The remaining area was to be used as a storage room, and landing area.
Fitting the plasterboard sheets to the wooden boxing sections was relatively quick and easy, though it was fiddly in places where awkward angles needed to be dealt with.
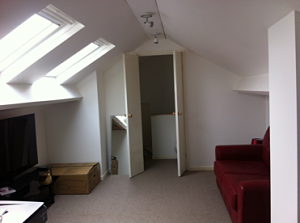
Once the walls we fitted with the plasterboard, we had to get a trained plasterer in to skim them, which involves applying a thin (3mm) layer of plaster to the boards to create a totally smooth and seamless finish, which we then painted white.
Some feature and cosmetic additions, such as the door and a carpet, and we were pretty much done. It was quite amazing to be standing in a brand new room we’d created from scratch, from a spider-ridden junkyard. The whole thing had taken us about three weeks of work, and cost around £8k less than we’d have spent on labour for a builder.
It’s excellent to have the extra space, especially when we have guests staying, though it’s taken some time to get used to saying ‘upstairs’ admittedly, but the main satisfaction comes from knowing we did it ourselves.
Neither of us are builders, but using a practical attitude, putting our heads together and a lot of time spent researching rules and regulations for safety and quality concerns, we were able to practically solve any issues that arose. And by the end of the three weeks, we were talking just like builders anyway.
The whole DIY loft conversion experience was fantastic for us both. We both learnt a great deal about building during the process, and I greatly enjoyed working with my Dad and learning from him; I even won him round to be a BBC Radio 5 Live listener by the end. If you’re trying to decide whether to do the work yourself on your own home, and the conditions are right, I say go for it!
Considering your own DIY loft conversion?
If you are then here are some key hints to consider.
• Is there enough space in your loft to make it worthwhile? Make sure you can easily stand up, especially as you may need to raise the floor a little to accommodate thicker joists.
• Will it add value? Despite the fact that adding extra rooms usually adds value, they can still be an expensive undertaking, especially if structural work is required. So it’s definitely worth getting some professional advice on how much you could expect to increase the value of your house.
• Do we have the skills and tools? My Dad and I weren’t builders, but he did have a background in Architecture, so he had good knowledge of important factors, such as structural strength. Drills, saws and sanders can all mount up, especially if you get good quality brands.
• Don’t rush/bodge it. It’s easy to get frustrated when you’ve screwed in a few hundreds screws and rush to get the next few in, but it’s vital you maintain high standards, otherwise you’ll find yourself wanting to pull up the carpet in a few months and do it properly.
• Get any electrical/plumbing work professionally done. Not only is this a legal requirement, it’s also vital to do the job safely, and a trained certified tradesman will be able to carry out the work and sign it off as needed for approval from your local housing department.
Are you planning a loft conversion? Tell us about it in the comments below!
Guest author profile
 |
When he's not doing DIY loft conversion, Nick Taylor works as an article writer for Regency Estates in Bolton, UK, a Sales and Lettings Agents with over 30 years experience in the local Property Market. |
<< Back to Property Investment Articles from DIY Loft Conversion
<< Back to Property Investment Blueprint from DIY Loft Conversion

Your Host, John Wilson -Investing In Property Since 2003, Amazon #1 Bestselling Author.